Install the app
how_to_install_app_on_ios
follow_along_with_video_below_to_see_how_to_install_our_site_as_web_app

Note: this_feature_currently_may_not_be_available_in_some_browsers
You are using an out of date browser. It may not display this or other websites correctly.
You should upgrade or use an alternative browser.
You should upgrade or use an alternative browser.
- Thread starter Jimbobble
- Start date
- Replies 23
- Views 28K
- Copy link Copy link
Search the forum,
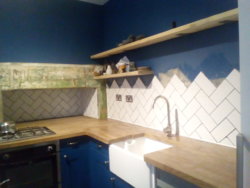
Same as a half bond metro set out but more to think about? Going to have a play about when I get a spare moment tomorrow. The B&Q video was funny
Very nice.
It's a dog tooth finish on the top they're after.
I still cannot see the logic in starting in the middle & hoping for the best. Goes against everything I was taught in setting out properly. Surely there's a better way than starting in the mid point & hoping to avoid little pieces?
I'll keep the border technique in mind for future jobs, looks really smart that. Nice choice of tiles too

Discuss Setting out Herringbone pattern in the Canada Tile Advice area at TilersForums.com.
J
Jimbobble
Spend lots of time measuring, it's tricky setting out but once your into it it's ok
Same as a half bond metro set out but more to think about? Going to have a play about when I get a spare moment tomorrow. The B&Q video was funny
S
Spare Tool
Its only the same as half bond metro set out if its 90 degrees, for 45 I'd be striking a line up centre of wall then drylay a row or two on the floor and measure off it then transfer measures to wall...if it is walls that is?Same as a half bond metro set out but more to think about? Going to have a play about when I get a spare moment tomorrow. The B&Q video was funny
S
Spacey360
Dont start with tile points on centre line or you'll get different size cuts either side
Theres 2 ways set out herringbone on a 45
First is to draw a line down the centre of a tile at 45 degree's and line that up on your centre line. Cuts will be equal sizes but opposite way around.
Second way to get the cuts the same way so they are like wings ( best way imo) is a bit more complicated to explain easy to show. Set two tiles herringboned and measure the distance between the points of each tiles but parallel. Then quater it and measure that distance off your centre line and thats you new line to start from off the points. If that makes sense
For example I use alot of 3x9 inch parquet tiles so id be starting 26mm off my centre line to get equal cuts on each side going the same way
B
Blunt Tool
Measure room in mm at precisely 23 centigrade, take latitude and longitude readings and times by length and breadth of room mm and divide by 23, find square root then calculate the curvature of the earth and take note of time add 4 then divide by 2, this will give you starting point!Dont start with tile points on centre line or you'll get different size cuts either side
Theres 2 ways set out herringbone on a 45
First is to draw a line down the centre of a tile at 45 degree's and line that up on your centre line. Cuts will be equal sizes but opposite way around.
Second way to get the cuts the same way so they are like wings ( best way imo) is a bit more complicated to explain easy to show. Set two tiles herringboned and measure the distance between the points of each tiles but parallel. Then quater it and measure that distance off your centre line and thats you new line to start from off the points. If that makes sense
For example I use alot of 3x9 inch parquet tiles so id be starting 26mm off my centre line to get equal cuts on each side going the same way
D
Dumbo
Just do what I do when setting out and guess . It always works
Did you ever work for a technical dept of an adhesive company because those are the questions they asked me when I said their adhesive had failed.Measure room in mm at precisely 23 centigrade, take latitude and longitude readings and times by length and breadth of room mm and divide by 23, find square root then calculate the curvature of the earth and take note of time add 4 then divide by 2, this will give you starting point!
J
Jimbobble
You could always frame the wall or floor makes life easier for the cuts....
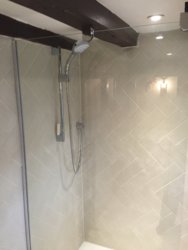
This is one I did last year..
View attachment 93052
Very nice.
It's a dog tooth finish on the top they're after.
I still cannot see the logic in starting in the middle & hoping for the best. Goes against everything I was taught in setting out properly. Surely there's a better way than starting in the mid point & hoping to avoid little pieces?
I'll keep the border technique in mind for future jobs, looks really smart that. Nice choice of tiles too
S
Spare Tool
Dry lay and a tape measure or staff Jim...not hope for the bestVery nice.
It's a dog tooth finish on the top they're after.
I still cannot see the logic in starting in the middle & hoping for the best. Goes against everything I was taught in setting out properly. Surely there's a better way than starting in the mid point & hoping to avoid little pieces?
I'll keep the border technique in mind for future jobs, looks really smart that. Nice choice of tiles too
H
hmtiling
You could always frame the wall or floor makes life easier for the cuts....
This is one I did last year..
View attachment 93052 [/QUOTE
was that your jotm Andy?You could always frame the wall or floor makes life easier for the cuts....
This is one I did last year..
View attachment 93052
J
Jimbobble
Enjoyed doing the herringbone a lot.
Have to say some great advice which was ACE!
& some total d**s**t advice in the mix too.
I'm wondering are there really tilers out there who can't set out properly?
Took me a while to get the jist of the pattern but realised it was the same as any other set out when I got into it.
Thanks for the help, always useful using this forum
On another note; a mate got me onto this arty stuff in London which I quite like.
gateways Adam Nathaniel Furman - Google Search - https://www.google.co.uk/search?q=gateways+Adam+Nathaniel+Furman&client=firefox-b&sa=X&dcr=0&tbm=isch&tbo=u&source=univ&ved=0ahUKEwjktI7AgbnWAhVoBsAKHS5QCH4Q7AkIRg&biw=1101&bih=780#imgrc=QV4vXYRLX0S0DM:
If you can be bothered digging about there's a more in depth video online where they walk through it (can't find the link sorry).
& there's a herringbone pattern in there which is awesome!
It's hard to describe but double diagonal, descending vertical over one tile width (or something like that - lovely work though)

Did you frame it first before laying the herringbone?You could always frame the wall or floor makes life easier for the cuts....
This is one I did last year..
View attachment 93052
Reply to Setting out Herringbone pattern in the Canada Tile Advice area at TilersForums.com
Make sure to mark a post as a solution for better transparency.
Posting a tiling question to the forum? Post in Tilers' Talk if you are unsure which forum to post in. We'll move it if there's a more suitable forum.

