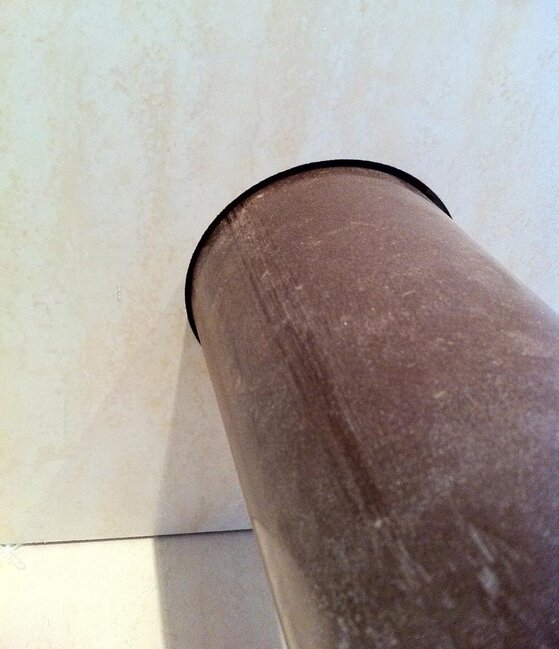
Discuss Drilling hole for soil pipe in ceramic tile in the America area at TilersForums. The USA and UK Tiling Forum (Also now Aus, Canada, ROI, and more)

D

Deleted member 1779

Standard RRP is £59.99 but as forum members will know if they plug in their discount code it will take money off.

We do have a long running deal which means if you type in the code: "BIGBOY" Then you can pick it up for thirty quid providing you buy it with the Bathroom Fitters Kit.

kit2.jpg
+
125g.jpg


= £49.99 for the main kit & £30 for the 115mm soil stack drill
But you must use code word BIGBOY on checkout
 
F

fulabeer

I've just bought the "offer" above and can testify that is worth every single penny! (fast delivery BTW)

I have never achieved such perfect holes for my shower feeds and soil pipe.
I watched the videos and thought it couldn't be that easy.
Well it is!

The shower feeds were very straight forward, and it took seconds for the hole to be cut.
It is so effortless that is actually a pleasure.

Next came the soil pipe. I've tried various methods in the past, and always been happy that the tile is behind the toilet...:lol:
I hated having to do them, and could easily spend a couple of hours trying to get the cut right.
I have been known to go through several tiles before being remotely happy with my soil pipe hole. (core drill bits are just too brutal)
It is amazing what some stiff grout and silicone can hide!

Not anymore....:hurray:

Today i cut my first absolutely perfect soil pipe hole.
I didn't have a pillar drill available, so i used the plasterboard method.
Once i had my template (plasterboard!) made, i just had to position it exactly were i wanted on the tile.
I started off slow and allowed the cutter to create a small groove.
This takes seconds, and once you see the tiles "powder", you know you are done.
I then removed the plasterboard, and carried on with just the wet sponge for cooling.
With "no pressure" (other than to hold the drill steady) and just keeping a slow steady speed, the cut was completed in seconds.
The hole produced was perfect. Talk about having a grin from ear to ear.
The fact it was so quick and i didn't ****-up or break any tiles, means it will pay for itself after two cuts.

For a change, this is a product that delivers what it promises.
The fact that they cut so quick means you don't have time to get bored or tired therefore making mistakes..(you know what it is like when your in a rush)
Because of the template system and the relatively slow speeds used, it is also much safer.

Excellent Excellent product :thumbsup:
 
Last edited by a moderator:
D

Deleted member 1779

Many thanks fulabeer our reputation in this industry is built on feedback like yours. There is nothing we can do or say to convince the majority so its always down to guys like you who put your hands in your pockets and actually USE the product.

I know what you mean about a product not doing all it can. I've been there at the shows and seen all the "wonder" stuff and "miricale" products. Even bought a few to find once you get them home the guy doing the demo had years of skill and made it all look so easy. I am so pleased the videos helped and we will be making some more this year!

Dsc08140.jpg

Sometimes a scrap of plasterboard can become a no nonsense way to get a job done.


F

fulabeer

A picture says a thousand words..!

IMG_0373.jpg

I went for the 115mm bit, as any plumber will tell you to allow a liitle room for pipe adjustment.
 
Last edited by a moderator:

Diggy

TF
Reaction score
179
60 quid!!!!!!!!!!!!!!!!!! holy cow.

I usually buy mine in bulk from here;

Used him 3 times over the years , never had a problem.

Cheers

Diggy
 
Last edited by a moderator:
D

Deleted member 1779

All tile drills need to be water cooled. Any that dont are either so expensive to buy, rip the material rather than drill, or shower the installer with dust and shards.

As mentioned always use water when drilling tiles for both cooling and dust collection.

sponge2a.jpg

Soak a sponge in water.

sponge3a.jpg

Dont wring it out.

sponge4a.jpg

keep it bloated with water.

sponge1a.jpg

When drilling on a wall hold UNDER the core to catch the debris and cool the core.

Dsc08171.jpg


When drilling on the flat (horizontal) you can dribble water on.
[Note: you will not need a CONSTANT stream - as shown above - Mearly a puddle of water]

[video=youtube;gfY6JXbkP0Q]http://www.youtube.com/watch?v=gfY6JXbkP0Q[/video]

We supply flat pack sponges - just activate in water.
But if you have your own then use that.

The downside of water spray bottles is that you still need a sponge to mop up the spoil.
 

Attachments

  • Dsc08171.jpg
    21.7 KB · Views: 15
D

Deleted member 1779

This is our latest video.
Not related to soil stacks and extract fans but more to do with drilling holes into toilets if the plumbing is in the wrong area !

[video=youtube;PpZVa5I0blA]http://www.youtube.com/watch?v=PpZVa5I0blA[/video]
 
F

fulabeer

This is our latest video.
Not related to soil stacks and extract fans but more to do with drilling holes into toilets if the plumbing is in the wrong area !

Hi Richard, i've just watched the video and thought i would try it out of the job i'm on.
I have got to say that the holes produced were fantastic. No burrs and very clean holes.
I put three in the bowl area without any problems.

I've just had a phone call from the customer complaing about water dripping downstairs when they flush the toilet.
Any ideas what i might have done wrong? Cheers Paul


:devil::devil::devil::devil::devil::devil::lol:
 

Diggy

TF
Reaction score
179
I've just had a phone call from the customer complaing about water dripping downstairs when they flush the toilet.
Any ideas what i might have done wrong? Cheers Paul
Probably 1 of 3 things.

1. Soil pipe not connected properly - if you tiled the floor you may need either a flexi or offset connector.

2. Cold feed not connected properly . . Maybe crossthreaded or the washer is shot.

3. Black donut not seated correctly . Cistern is on the tilt , usually because the walls have been tiled , in which case you may just need to move pan forward slightly.

HTH

Diggy
 
D

Deleted member 1779

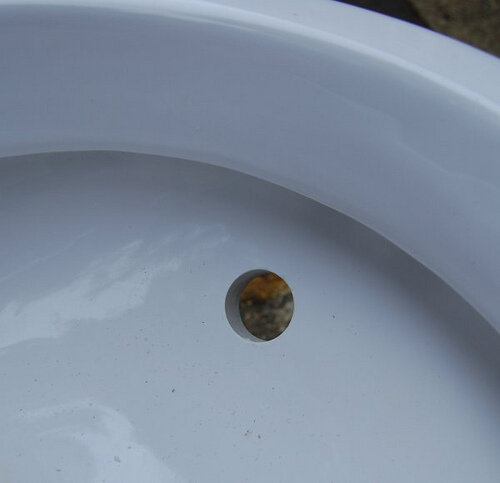
I've just photographed the holes on the toilet that we drilled. Here they are close up:

5420908387_e94b7820b6.jpg

Wide Shot

5420908513_d1ee78f95c.jpg

Yes I agree the holes are perfect

There could be three reasons that your customer is experiencig a leak
1) There is an unrelated problem in the water feed somewhere in the pipe system.
2) There is a related problem in the pipework delivering water to your appliance.
3) There is problem with the waste.

On an unrelated project I have just fitted a waste trap to a sink and (silly me) I tried to do it withought silicone. Big mistake! - The rubber seal supplied was not man enough for the job. So it was a matter of strip it down wipe it with alcohol and use silicone on all joints. That stopped the leak but I will say that if the leak is waste related there is never any real major loss of water its just a drip drip.

On the other hand if its to do with the water supply then the results can be dramatic and it doesnt take long for wet patches to appear. I would go back and check all joints and make sure that you use some silicone where it touches the ceramic.

Finally I have found that sometimes a problem is nothing to do with the project in hand. Old pipes may have been distrurbed OR it can just be bad luck. Before you suspect the appliance in question keep an open mind that it may be totally unrelated.

Bottom line is that it will take a bit of detective work but I have always found the solution on basins, loos etc to be the use of silicone.

Note these are just my own thoughts on leak finding and repair - others may disagree.
 
G

Gazzer

Probably 1 of 3 things.

1. Soil pipe not connected properly - if you tiled the floor you may need either a flexi or offset connector.

2. Cold feed not connected properly . . Maybe crossthreaded or the washer is shot.

3. Black donut not seated correctly . Cistern is on the tilt , usually because the walls have been tiled , in which case you may just need to move pan forward slightly.

HTH

Diggy


Lol :lol::lol::lol::lol::lol: Its not April 1st already is it ?
 
Last edited by a moderator:
F

fulabeer

This picture is similar to where i drilled the holes.

5420908387_e94b7820b6.jpg

I'm thinking maybe i should have used something to seal the holes?

:devil::devil::devil:
 
Last edited by a moderator:

Reply to Drilling hole for soil pipe in ceramic tile in the America area at TilersForums.com

Or checkout our tile courses and training forum or the Tile Blog / Latest Blog Posts

This website is hosted and managed by www.untoldmedia.co.uk. Creating content since 2001.
Tile Contractor Forum. The useful tile contractor website.

UK Tiling Forum Stats

Threads
67,365
Messages
881,183
Members
9,531
Latest member
Dawz84
Top
AdBlock Detected

We get it, advertisements are annoying!

Sure, ad-blocking software does a great job at blocking ads, but it also blocks useful features of our website. For the best site experience please disable your AdBlocker.

I've Disabled AdBlock    No Thanks