Discuss Preparation advice please in the Canada Tile Advice area at TilersForums.com.

Raccus

TF
Reaction score
6
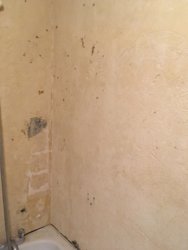
Removed old tiles in a bathroom. New 60x30 porcs to go on. Plaster skim came off with odd tiles, so left with bonding coat (pic 1). Done some research and found that one shouldnt tile onto a bonding coat (2reasons: sucks moisture from adhesive but even if you thoroughly primed it hoping to alleviate that problem, the adhesive setting it can actually destroy and pull away the surface of bond coat because the bond coat is not that strong). Will be bordering weight limits with a skim coat, and also dont want to wait for it do dry if a better alternative. So will be tile backing the walls which will address both points. So far so good i hope, but please critique as needed.

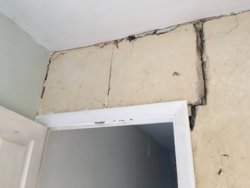
What I have more doubts about are cracks above the doorway (pics 2). This is an upstairs bathroom with wooden floor floorboards. There is no lintel above door, although no course work above ceiling level, as its just loft space. But still looks like it should have had a lintel. Do you suggest i insert a lintel, or just board over the blockwork, or even remove all the blockwork and then fit framing and backer board. Or any other suggestions? I would have thought it should have had a lintel to begin with, but maybe if no courses above it isnt required, i dont know regulations/best practice on that. But this is what i have now.

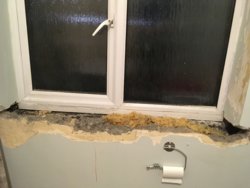
Then for window sill (pic 3). Bit of a mess. What do i do here? Not sure there is quite enough space for any framing to fix backer board. What other alternatives are there to square it up? Do i use: mortar, tile addy, bonding coat and skim, or multi finish coat?

Thank you in advance if you take time to reply.
IMG_1122.JPG IMG_1112.JPG IMG_1121.JPG
 
W

Waluigi

I’d knock all the render off and use a combination of plasterboard and tile backer board. Both dot and dabbed, tilebacker board also mechanically fixed.

I’d have a look at that crack above the doorway too. Re point the blocks if necessary , galvanised mesh screwed onto either side of the crack. Filled with mortar, skimmed up with mortar and then dot and dab a board straight on top of it, the crack won’t come back through the plasterboard.

Window, same again- dot and dab a board on. It’ll take a tradesman two days to knock all the render off and re board the entire room. Two days we’ll spent IMO. Horrible job but getting this done right will be the best possible course of action. Otherwise if you leave the render on, the whole job will be starting on a compromise.

Regarding the door frame etc, architrave off and just build out the door liner with planed timber to accommodate the thicker wall. Architrave back on after you’re boarded.
 

Raccus

TF
Reaction score
6
Thanks for that. I did contemplate taking off the render, but wasnt sure how easily it would come off, so didnt want to start and find it was well stuck and not necessary to remove, but only after having left a a hole. But if boards are mechanically fixed on anyway, that will go though to the block behind, so wondering what added benefit you see to removing the render?
 

Nic_P74

TF
Esteemed
Esteemed
Reaction score
1,170
Removing the render you will be fixed to block with the bonding adhesive not the render (which may come off) less weight on the walls overall as well. Also gives you more space for getting walls plumb.
 

Raccus

TF
Reaction score
6
ok, not saying you guys are wrong, but some of the reasons for removing render arnt adding up. Im not implying Im going to just do my own thing regardless, or else i wouldnt be asking advice here, so please dont be offended by my debate.

Agreed, if i was adhesiving the backer boards on then fair enough, cant do that onto the render, so remove it. But I intend to mechanically fix boards to wall. Dowel is 60mm, backer boards probly 10mm and render about 10-15mm, so that leaves say 35mm into the block. Seems ok to me; would you consider that insufficient? And as to reducing weight on the walls, shouldnt matter if boards mechanically fixed into block behind.

Wrt space, yes taking render off would save 10-15mm which id like, but the work involved taking it off doesnt seem justified. I tried taking it the cracked wall, and its a job- doesnt come off easily.

Agreed, would help to see cracks, but im happy the longer wall is not badly affected. The other wall with cracks, is the one i tried to remove it from and have mostly, but like i say, didnt come off easily :(
 
W

Waluigi

You can absolutely leave the render on, there’s no reason why not. Keep in mind you are adding a healthy 18 to 25mm + to every single wall in the room depending on how Plumb the current wall is. For example if one of your current walls tapers away from you out of level from top to bottom by 15mm, by the time you have corrected that there might be 40mm thickness of board where your bath/shower is going. I hope that makes sense.
 

Reply to Preparation advice please in the Canada Tile Advice area at TilersForums.com

Or checkout our tile courses and training forum or the Tile Blog / Latest Blog Posts

There are similar tiling threads here

    • Like
Bathroom floor. I would be grateful for advice on how to prepare my bathroom sub floor ready for...
Replies
1
Views
351
Hi! I'm looking for some advice, I have laid some SLC (Mapei 1210) in our conservatory in...
Replies
5
Views
471
Good morning all. After a little advice. I'll post pictures a bit later. However.... The...
Replies
6
Views
680
I had a small leak in the main water line before the stop tap in my 1950s house. The copper pipe...
Replies
1
Views
540
Hi all. Just wanting some advice and wondering what the pros in here are using nowadays for...
Replies
2
Views
453
This website is hosted and managed by www.untoldmedia.co.uk. Creating content since 2001.
Please visit our sponsor websites, they keep the forum free to use!
Tile Contractor Forum. The useful tile contractor website.

Replies you've not seen

New Tiling Questions

UK Tiling Forum Stats

Threads
67,343
Messages
881,166
Members
9,535
Latest member
Teejay
Top